Manage your own DNS
When you purchase a domain, the seller of the domain usually offers the possibility to manage the DNS records of this domain from a web interface. In this case you are using their nameservers. However it is also possible to manage your domains yourself, and it is not too difficult. In this article we will see a way of doing it.
1. How DNS works
1.1. The steps
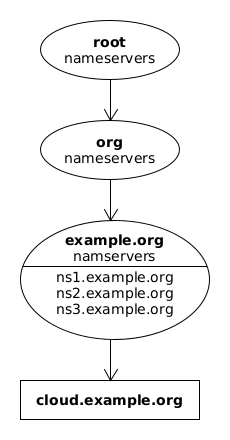
Let’s say that a client (a browser) needs to access
cloud.example.org. For this, it needs to find out the address (IP)
of the server. Assuming that it knows nothing about it, the client can
follow these steps:
-
Contact a root nameserver and ask it which servers are responsible for managing the top-level domain
.org. There are several root nameservers, all of them are synchronized with each-other, and each of them has information about the servers responsible for each top-level domain. -
From the query on the first step the client gets a list of the servers responsible for the domain
.org. Again, all of these servers are synchronized with each-other and it can ask any of them for the servers that are responsible for the subdomainexample.org. -
From the query on the previous step it will get a list of nameservers for the domain
example.org, for example:ns1.example.org ns2.example.org ns3.example.org ns4.example.org
-
Finally, the client can ask any of these nameservers for the IP of the server
cloud.example.org(and should get the same answer).
This diagram tries to show the hierarchy of the nameservers.
1.2. An example
Let’s try to follow these steps manually for a real domain, for
example ocw.fs.al. We can use the command dig to make DNS
queries.
1.2.1. Get the root nameservers
user@host $ dig NS . ; <<>> DiG 9.16.1-Ubuntu <<>> NS . ;; global options: +cmd ;; Got answer: ;; ->>HEADER<<- opcode: QUERY, status: NOERROR, id: 39832 ;; flags: qr rd ra ad; QUERY: 1, ANSWER: 13, AUTHORITY: 0, ADDITIONAL: 1 ;; OPT PSEUDOSECTION: ; EDNS: version: 0, flags:; udp: 512 ;; QUESTION SECTION: ;. IN NS ;; ANSWER SECTION: . 4353 IN NS a.root-servers.net. . 4353 IN NS b.root-servers.net. . 4353 IN NS c.root-servers.net. . 4353 IN NS d.root-servers.net. . 4353 IN NS e.root-servers.net. . 4353 IN NS f.root-servers.net. . 4353 IN NS g.root-servers.net. . 4353 IN NS h.root-servers.net. . 4353 IN NS i.root-servers.net. . 4353 IN NS j.root-servers.net. . 4353 IN NS k.root-servers.net. . 4353 IN NS l.root-servers.net. . 4353 IN NS m.root-servers.net. ;; Query time: 64 msec ;; SERVER: 8.8.8.8#53(8.8.8.8) ;; WHEN: Sat Mar 19 00:12:09 CET 2022 ;; MSG SIZE rcvd: 239
We get a more compact answer with the option +short:
user@host $ dig NS . +short m.root-servers.net. b.root-servers.net. c.root-servers.net. d.root-servers.net. e.root-servers.net. f.root-servers.net. g.root-servers.net. h.root-servers.net. a.root-servers.net. i.root-servers.net. j.root-servers.net. k.root-servers.net. l.root-servers.net.
The type of records we are asking for is NS (for nameserver), and we
are asking them for the . (root) domain. We would get the same
answer if we just used dig without any options, since these are
the default ones.
1.2.2. Get the nameservers of the top-level domain al
We can send a query to any of the root servers above, requesting
information about the nameservers of the top-level domain al.
user@host $ dig NS al @m.root-servers.net. ; <<>> DiG 9.16.1-Ubuntu <<>> NS al @f.root-servers.net. ;; global options: +cmd ;; Got answer: ;; ->>HEADER<<- opcode: QUERY, status: NOERROR, id: 6901 ;; flags: qr rd; QUERY: 1, ANSWER: 0, AUTHORITY: 4, ADDITIONAL: 9 ;; WARNING: recursion requested but not available ;; OPT PSEUDOSECTION: ; EDNS: version: 0, flags:; udp: 1472 ;; QUESTION SECTION: ;al. IN NS ;; AUTHORITY SECTION: al. 172800 IN NS ns1.nic.al. al. 172800 IN NS nsx.nic.al. al. 172800 IN NS rip.psg.com. al. 172800 IN NS munnari.oz.au. ;; ADDITIONAL SECTION: ns1.nic.al. 172800 IN A 194.1.149.230 nsx.nic.al. 172800 IN A 194.0.11.108 nsx.nic.al. 172800 IN AAAA 2001:678:e:108::53 rip.psg.com. 172800 IN A 147.28.0.39 rip.psg.com. 172800 IN AAAA 2001:418:1::39 munnari.oz.au. 172800 IN A 202.29.151.3 munnari.oz.au. 172800 IN AAAA 2001:3c8:9007:1::21 munnari.oz.au. 172800 IN AAAA 2001:3c8:9009:181::2 ;; Query time: 71 msec ;; SERVER: 192.5.5.241#53(192.5.5.241) ;; WHEN: Sat Mar 19 00:14:35 CET 2022 ;; MSG SIZE rcvd: 299
user@host $ dig NS al +short nsx.nic.al. munnari.oz.au. ns1.nic.al. rip.psg.com.
1.2.3. Get the nameservers of fs.al
We can ask (query) any of the nameservers of the domain al to tell
us what are the nameservers of the subdomain fs.al.
user@host $ dig NS fs.al @nsx.nic.al. ; <<>> DiG 9.16.1-Ubuntu <<>> NS fs.al @nsx.nic.al. ;; global options: +cmd ;; Got answer: ;; ->>HEADER<<- opcode: QUERY, status: NOERROR, id: 56093 ;; flags: qr rd; QUERY: 1, ANSWER: 0, AUTHORITY: 5, ADDITIONAL: 1 ;; WARNING: recursion requested but not available ;; OPT PSEUDOSECTION: ; EDNS: version: 0, flags:; udp: 1452 ; COOKIE: 254ac1feecfed7ceb07612a96235138c6072415c7ccacbbc (good) ;; QUESTION SECTION: ;fs.al. IN NS ;; AUTHORITY SECTION: fs.al. 18000 IN NS ns1.he.net. fs.al. 18000 IN NS ns2.afraid.org. fs.al. 18000 IN NS puck.nether.net. fs.al. 18000 IN NS uz5qfm8n244kn4qz8mh437w9kzvpudduwyldp5361v9n0vh8sx5ucu.free.ns.buddyns.com. fs.al. 18000 IN NS ns0.1984.is. ;; Query time: 79 msec ;; SERVER: 194.0.11.108#53(194.0.11.108) ;; WHEN: Sat Mar 19 00:19:40 CET 2022 ;; MSG SIZE rcvd: 256
It we don’t specify the nameserver to be asked (with the
argument starting with @), a random one from the list will be
asked. If it does not reply, another one will be asked, and so on.
|
user@host $ dig NS fs.al +short ns0.1984.is. ns1.he.net. ns2.afraid.org. uz5qfm8n244kn4qz8mh437w9kzvpudduwyldp5361v9n0vh8sx5ucu.free.ns.buddyns.com. puck.nether.net.
1.3. Synchronizing nameservers
Let’s say that the nameservers of the domain example.org are:
ns1.example.org
ns2.example.org
ns3.example.org
ns4.example.org
These nameservers need to be synchronized with each-other. How do we achieve that? One of these nameservers (for example the first one) can be primary, and the others secondary. Modification of the records is always done on the primary nameserver, and the secondary nameservers will eventually synchronize their content with the primary one.
The primary nameserver can also be another one, that is not on the list, and all the nameservers of the domain with retrieve the content from it. This is a better approach because the primary nameserver can be placed behind a firewall, forbidding access to everyone, except the secondary nameservers.
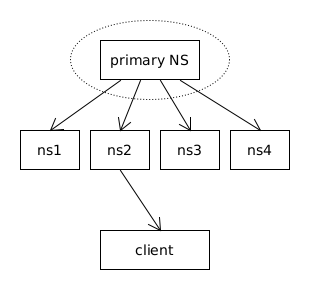
When a modification on the records of the primary NS is done, it notifies the secondary NSs about it. When the secondary NSs get this notification, they send a synchronization (AXFR) request to the primary NS, in order to retrieve from it an updated list of records. Upon receiving this list, they replace the old list of records with the new one.
Notice that the clients do not send any requests to the primary NS, but only to the secondary ones, because only these are published as nameservers for the domain. They don’t even know the address (IP) of the primary NS. Only the secondary nameservers know its IP. But even if a client knows the IP of the primary NS and tries to access it, it will be prevented by the firewall, because the firewall allows only the secondary nameservers to access the primary one on port 53, in order to send AXFR (synchronization) requests. Even if there was no firewall, the primary server is configured to reply only to synchronization requests from the secondary nameservers.
2. DNS setup
Now that we know how DNS works, it will be easier to setup and manage our DNS server.
2.1. Find secondary NS services
Instead of building and maintaining our own secondary nameservers, we can use services that are available either for free or for a small price. You can do a quick search and find some that may suit your needs.
I am listing here some of them that offer a free service:
| The "primary/secondary" nameservers are also called "master/slave". You may find this terminology used on the websites above. |
2.2. Install the primary nameserver
We will install the primary nameserver with an NSD container.
Assuming that you have already
installed ds,
you have to:
-
Get the scripts and initialize a directory for the container:
ds pull nsd ds init nsd @nsd -
Customize the settings and make the container:
cd /var/ds/nsd/
vim settings.sh
ds make
2.3. Make sure that port 53 is free
The NSD container that we tried to install above needs access to the
port 53 of the host. If this port is already being used by
something else, there will be a conflict and the container will fail
to start.
To check whether there is something listening to this port, use the
command lsof -i :53. On the systems that use systemd, usually
there is a service named systemd-resolved which is listening on port
53. Let’s see how to prevent systemd-resolved from using port
53.
-
Edit
/etc/systemd/resolved.conf, uncommentDNSStubListenerand set it tono.This will free up port 53. However, we also need to enable a DNS server, otherwise we won’t be able to resolve any domain names, to download anything, to install any packages, etc. Follow the other steps to do it.
-
On
/etc/systemd/resolved.conf, uncomment also the line that starts withDNS=and set a suitable value to it, for exampleDNS=8.8.8.8. This file now should look like this:[Resolve] DNS=8.8.8.8 #FallbackDNS= #Domains= #LLMNR=no #MulticastDNS=no #DNSSEC=no #DNSOverTLS=no #Cache=no-negative DNSStubListener=no #ReadEtcHosts=yes -
Create a symbolic link for
/run/systemd/resolve/resolv.confwith/etc/resolv.confas the destination:ln -sf /run/systemd/resolve/resolv.conf /etc/resolv.conf -
Reboot the system.
-
Check that port 53 is now free, then remake the NSD container:
lsof -i :53
cd /var/ds/nsd/
ds make
Now it should work.
| These instructions have been tested on Ubuntu, but they should work the same on Debian or any other system having systemd version 232 or newer. |
2.4. Configuration files
The default settings on the config file settings.sh look like
this:
SECONDARY_NS="
    $(: https://www.buddyns.com/support/setup/zone-delegation/free/ )
    uz5qfm8n244kn4qz8mh437w9kzvpudduwyldp5361v9n0vh8sx5ucu.free.ns.buddyns.com    $(: 'USA, California' )
    uz5x36jqv06q5yulzwcblfzcrk1b479xdttdm1nrgfglzs57bmctl8.free.ns.buddyns.com    $(: 'Germany, EU' )

    ns0.1984.is
    $(: ns1.1984.is )
    $(: ns2.1984.is )
    $(: ns1.1984hosting.com )
    $(: ns2.1984hosting.com )

    $(: https://puck.nether.net/dns/static/faq.html )
    puck.nether.net

    $(: https://freedns.afraid.org/secondary/instructions.php )
    ns2.afraid.org
"
AXFR_SERVERS="
    $(: https://www.buddyns.com/support/setup/zone-transfer/free/ )
    108.61.224.67
    116.203.6.3
    107.191.99.111
    185.22.172.112
    103.6.87.125
    192.184.93.99
    119.252.20.56
    31.220.30.73
    185.34.136.178
    185.136.176.247
    45.77.29.133
    116.203.0.64
    167.88.161.228
    199.195.249.208
    104.244.78.122

    $(: '1984hosting.com' )
    93.95.224.6

    $(: 'puck.nether.net' )
    204.42.254.5

    $(: 'freedns.afraid.org' )
    69.65.50.192
"
The variable SECONDARY_NS is used by the installation scripts to
create the configuration file config/secondary.ns, which looks like this:
@  IN  NS  uz5qfm8n244kn4qz8mh437w9kzvpudduwyldp5361v9n0vh8sx5ucu.free.ns.buddyns.com.
@  IN  NS  uz5x36jqv06q5yulzwcblfzcrk1b479xdttdm1nrgfglzs57bmctl8.free.ns.buddyns.com.
@  IN  NS  ns0.1984.is.
@  IN  NS  puck.nether.net.
@  IN  NS  ns2.afraid.org.
This file is included in a zone configuration with a directive like this:
$INCLUDE /host/config/secondary.ns
The variable AXFR_SERVERS is used to create the files
config/notify.conf and config/provide-xfr.conf, which
look like these:
notify: 108.61.224.67 NOKEY
notify: 116.203.6.3 NOKEY
notify: 107.191.99.111 NOKEY
notify: 185.22.172.112 NOKEY
notify: 103.6.87.125 NOKEY
notify: 192.184.93.99 NOKEY
notify: 119.252.20.56 NOKEY
notify: 31.220.30.73 NOKEY
notify: 185.34.136.178 NOKEY
notify: 185.136.176.247 NOKEY
notify: 45.77.29.133 NOKEY
notify: 116.203.0.64 NOKEY
notify: 167.88.161.228 NOKEY
notify: 199.195.249.208 NOKEY
notify: 104.244.78.122 NOKEY
notify: 93.95.224.6 NOKEY
notify: 204.42.254.5 NOKEY
notify: 69.65.50.192 NOKEY
provide-xfr: 108.61.224.67 NOKEY
provide-xfr: 116.203.6.3 NOKEY
provide-xfr: 107.191.99.111 NOKEY
provide-xfr: 185.22.172.112 NOKEY
provide-xfr: 103.6.87.125 NOKEY
provide-xfr: 192.184.93.99 NOKEY
provide-xfr: 119.252.20.56 NOKEY
provide-xfr: 31.220.30.73 NOKEY
provide-xfr: 185.34.136.178 NOKEY
provide-xfr: 185.136.176.247 NOKEY
provide-xfr: 45.77.29.133 NOKEY
provide-xfr: 116.203.0.64 NOKEY
provide-xfr: 167.88.161.228 NOKEY
provide-xfr: 199.195.249.208 NOKEY
provide-xfr: 104.244.78.122 NOKEY
provide-xfr: 93.95.224.6 NOKEY
provide-xfr: 204.42.254.5 NOKEY
provide-xfr: 69.65.50.192 NOKEY
provide-xfr: 127.0.0.1 NOKEY
Both of these are used to define the pattern axfr-servers in the
main config file config/nsd.conf:
pattern:
    name: axfr-servers
    include: /host/config/notify.conf
    include: /host/config/provide-xfr.conf
This pattern is included in the definition of a zone like this:
zone:
    name: example.org
    zonefile: example.org.db
    include-pattern: "axfr-servers"
The IP list on AXFR_SERVERS is also used to open the port 53 on the
firewall for the secondary servers:
user@host /var/ds/nsd # ds exec iptables-save | grep ufw-user-input
:ufw-user-input - [0:0]
-A ufw-before-input -j ufw-user-input
-A ufw-user-input -s 108.61.224.67/32 -p tcp -m tcp --dport 53 -j ACCEPT
-A ufw-user-input -s 108.61.224.67/32 -p udp -m udp --dport 53 -j ACCEPT
-A ufw-user-input -s 116.203.6.3/32 -p tcp -m tcp --dport 53 -j ACCEPT
-A ufw-user-input -s 116.203.6.3/32 -p udp -m udp --dport 53 -j ACCEPT
-A ufw-user-input -s 107.191.99.111/32 -p tcp -m tcp --dport 53 -j ACCEPT
-A ufw-user-input -s 107.191.99.111/32 -p udp -m udp --dport 53 -j ACCEPT
-A ufw-user-input -s 185.22.172.112/32 -p tcp -m tcp --dport 53 -j ACCEPT
-A ufw-user-input -s 185.22.172.112/32 -p udp -m udp --dport 53 -j ACCEPT
-A ufw-user-input -s 103.6.87.125/32 -p tcp -m tcp --dport 53 -j ACCEPT
-A ufw-user-input -s 103.6.87.125/32 -p udp -m udp --dport 53 -j ACCEPT
-A ufw-user-input -s 192.184.93.99/32 -p tcp -m tcp --dport 53 -j ACCEPT
-A ufw-user-input -s 192.184.93.99/32 -p udp -m udp --dport 53 -j ACCEPT
-A ufw-user-input -s 119.252.20.56/32 -p tcp -m tcp --dport 53 -j ACCEPT
-A ufw-user-input -s 119.252.20.56/32 -p udp -m udp --dport 53 -j ACCEPT
-A ufw-user-input -s 31.220.30.73/32 -p tcp -m tcp --dport 53 -j ACCEPT
-A ufw-user-input -s 31.220.30.73/32 -p udp -m udp --dport 53 -j ACCEPT
-A ufw-user-input -s 185.34.136.178/32 -p tcp -m tcp --dport 53 -j ACCEPT
-A ufw-user-input -s 185.34.136.178/32 -p udp -m udp --dport 53 -j ACCEPT
-A ufw-user-input -s 185.136.176.247/32 -p tcp -m tcp --dport 53 -j ACCEPT
-A ufw-user-input -s 185.136.176.247/32 -p udp -m udp --dport 53 -j ACCEPT
-A ufw-user-input -s 45.77.29.133/32 -p tcp -m tcp --dport 53 -j ACCEPT
-A ufw-user-input -s 45.77.29.133/32 -p udp -m udp --dport 53 -j ACCEPT
-A ufw-user-input -s 116.203.0.64/32 -p tcp -m tcp --dport 53 -j ACCEPT
-A ufw-user-input -s 116.203.0.64/32 -p udp -m udp --dport 53 -j ACCEPT
-A ufw-user-input -s 167.88.161.228/32 -p tcp -m tcp --dport 53 -j ACCEPT
-A ufw-user-input -s 167.88.161.228/32 -p udp -m udp --dport 53 -j ACCEPT
-A ufw-user-input -s 199.195.249.208/32 -p tcp -m tcp --dport 53 -j ACCEPT
-A ufw-user-input -s 199.195.249.208/32 -p udp -m udp --dport 53 -j ACCEPT
-A ufw-user-input -s 104.244.78.122/32 -p tcp -m tcp --dport 53 -j ACCEPT
-A ufw-user-input -s 104.244.78.122/32 -p udp -m udp --dport 53 -j ACCEPT
-A ufw-user-input -s 93.95.224.6/32 -p tcp -m tcp --dport 53 -j ACCEPT
-A ufw-user-input -s 93.95.224.6/32 -p udp -m udp --dport 53 -j ACCEPT
-A ufw-user-input -s 204.42.254.5/32 -p tcp -m tcp --dport 53 -j ACCEPT
-A ufw-user-input -s 204.42.254.5/32 -p udp -m udp --dport 53 -j ACCEPT
-A ufw-user-input -s 69.65.50.192/32 -p tcp -m tcp --dport 53 -j ACCEPT
-A ufw-user-input -s 69.65.50.192/32 -p udp -m udp --dport 53 -j ACCEPT
2.5. Customize secondary nameservers
To customize the secondary nameservers, we should edit the constants
SECONDARY_NS and AXFR_SERVERS on settings.sh. Then run
again ds make, which will rebuild the container and will
regenerate the configuration files mentioned above
(config/secondary.ns, config/notify.conf,
config/provide-xfr.conf), as well as update the firewall
rules.
It might help to have a look at the URLs provided as comments in
settings.sh:
3. Manage domains
3.1. Add a domain
Let’s say that you have purchased the domain example.org.
3.1.1. Set the nameservers of the domain
The seller of the domain usually offers the possibility to manage the records of this domain in their nameservers. However they also allow you to manage your domain with your own nameservers, which is what we want. You have to tell them what are the nameservers for the domain.
We are going to use secondary nameservers like those that we saw above in the configuration. If you did not customize the configuration, then the nameservers that we should register are these:
-
uz5qfm8n244kn4qz8mh437w9kzvpudduwyldp5361v9n0vh8sx5ucu.free.ns.buddyns.com -
uz5x36jqv06q5yulzwcblfzcrk1b479xdttdm1nrgfglzs57bmctl8.free.ns.buddyns.com -
ns0.1984.is -
puck.nether.net -
ns2.afraid.org
3.1.2. Add the domain to each secondary NS service
The services that provide the secondary nameservers don’t know yet that we want them to manage this domain, and don’t know what is the primary nameserver for this domain, from which they are going to retrieve the records of this domain. So, the next step is to go to the web interface of each of them, login, and add the domain to be managed, along with the IP of the primary nameserver of this domain. This IP is the public IP of the server where we installed the NSD container.
The websites of the secondary nameserver services that we have used above are these:
3.1.3. Add a zone on the primary nameserver
The next step is to add a zone for this domain in the NSD container:
cd /var/ds/nsd/
ds zone
ds zone add example.org
ls zones/
The content of the file zones/example.org.db should look like
this:
$TTL    24h
$ORIGIN example.org.
@  1D  IN  SOA  ns1  admin (
    2022040901 ; serial
    3H         ; refresh
    15m        ; retry
    1w         ; expire
    2h         ; minimum
)

$INCLUDE /host/config/secondary.ns

ns1  IN  A  10.11.12.13

@    IN  A  10.11.12.13
*    IN  A  10.11.12.13

; redirect subdomains to other servers
;test        IN  A  10.21.31.41

; redirecting by CNAME (for example to gitlab pages)
;www         IN  CNAME  example1.gitlab.io.
;info        IN  CNAME  example2.gitlab.io.
3.2. Modify DNS records
Each time that we modify some records on the file
zones/example.org.db, we should also update the serial number.
Then we notify the secondary nameservers that there are some updates
with ds notify. After reloading the zones and sending
notifications, it starts to trace the logs. So, it is OK to stop it
with Ctrl-c after a few seconds.
Alternatively, a ds restart will also reload the zones and send
notifications to the secondary nameservers.
4. Troubleshooting
We can make some simple checks and tests like this:
ds check
ds check --config
ds check --zones
To check the AXFR response for a domain:
ds zone
ds zone test example.org
It will actually list all the records that will be sent to a secondary nameserver.
For further troubleshooting, we can get a shell inside the container and try commands like these:
service nsd restart
service nsd status
tail /var/log/syslog -n 30
dig @localhost AXFR example.org
ufw status
5. Maintenance
5.1. Migrate the primary nameserver
To migrate the container of the primary nameserver to another host, we
should transfer (with scp or rsync) the content of
/var/ds/nsd/ from the old host to the new one. Then on the new
host we should run:
ds pull nsd
cd /var/ds/nsd/
ds make
We may also need to resolve any conflicts with the port 53
on the new host.
|
Now the public IP of the master nameserver has been changed (to the IP of the new host), so we should update it on the configuration of each secondary nameserver, for each domain.
| If you are managing many domains this may be a bit tedious, because it has to be done manually, but hopefully you are not doing such a migration frequently. |
5.2. Modify secondary nameservers
If you need to modify the list of secondary nameservers, for example
add ns1.1984.is on the list, or remove one from the list, you should
also make sure to update these things:
-
For each domain that you manage, go to the website of the provider of the domain and update the list of the nameservers.
-
If you are adding a new secondary nameserver, go to the website of the nameserver and make sure that you add there all the domains that you manage, along with the public IP of the primary nameserver.
-
On the primary nameserver, update
settings.shaccordingly and then runds maketo update the configuration files.
6. Manage subdomains
The records of a subdomain can be managed on the same (primary)
nameserver as those of the domain itself. For example, if we need a
record for cloud.test1.example.org we can add it on the file
zones/example.org.db.
However, if we want to manage a subdomain on a separate nameserver, for example to delegate its maintenance to someone else, we can do it like this:
-
First of all we need to declare what are the nameservers that will serve this subdomain.
-
Let’s create the file
config/test1.example.org.nsthat has a list of the nameservers, like this:test1.example.org. IN NS uz5qfm8n244kn4qz8mh437w9kzvpudduwyldp5361v9n0vh8sx5ucu.free.ns.buddyns.com. test1.example.org. IN NS uz5x36jqv06q5yulzwcblfzcrk1b479xdttdm1nrgfglzs57bmctl8.free.ns.buddyns.com.
Since this is a subdomain that is used for testing, we are using just two nameservers from buddyns.com, in order to keep the maintenance simple. -
We also need to edit the file
zones/example.org.dband add an include directive like this:$INCLUDE /host/config/test1.example.org.ns
-
Don’t forget also to update the serial number on
zones/example.org.dband to push the changes withds restartords notify.
-
-
Go to https://www.buddyns.com/ and add the domain
test1.example.org, along with the public IP of the primary nameserver. -
Install NSD on another host, making sure that you have the necessary settings for
buddynsonsettings.sh(variablesSECONDARY_NSandAXFR_SERVERS). -
On the new primary nameserver, add a new zone for the domain
test1.example.org:cd /var/ds/nsd/ ds zone ds zone add test1.example.org ls zones/ ds restart ds zone test test1.example.org
Basically, these are the same steps that we do for a normal domain, except that for the subdomain we declare the nameservers on the configuration of the main domain, instead of registering them on the website of some domain provider, since in this case it is us who are the provider of the subdomain.