Testing DebianEdu with LXD
- 1. Introduction
- 2. Setup
- 3. Install the main server
- 4. Test LTSP clients
- 5. Test workstations
- 6. Test a roaming workstation
- 7. Separate LTSP server
- 8. Misc
- 9. Appendices
1. Introduction
DebianEdu aka Skolelinux is a Linux distribution based on Debian providing an out-of-the box environment of a completely configured school network.
After installation of a main server all services needed for a school network are set up and the system is ready to be used. Only users and machines need to be added via GOsa², a comfortable Web-UI, or any other LDAP editor.
A netbooting environment using PXE/iPXE has also been prepared, so after initial installation of the main server (from CD, Blu-ray disc or USB flash drive) all other machines can be installed via the network. This includes "roaming workstations" (ones that can be taken away from the school network, usually laptops or netbooks).
Also, machines can be booted via PXE/iPXE as diskless workstations or thin clients.
Several educational applications like GeoGebra, Kalzium, KGeography, GNU Solfege and Scratch are included in the default desktop setup, which can be extended easily and almost endlessly via the Debian universe.
2. Setup
2.1. Install LXD
On the server (ubuntu:22.04) I have installed LXD with snap, like
this:
apt install snapd
snap --version
snap install lxd --channel=latest/stable
snap list
lxc list
lxd init
I have used a btrfs storage backend and more than 30GB
storage size. I have also disabled IPv6 for the containers. Other than
that, everything else was the default setting.
|
2.2. Access LXD from non-root user
-
Create a user first:
adduser user1 -
Enable remote connection on the server:
lxc config set core.https_address "[::]" lxc config set core.trust_password pass1234 -
As
user1, add a remote, like this:su - user1 lxc remote add localhost 127.0.0.1This will prompt you to confirm the fingerprint and then ask you for the password (
pass1234). -
Make it the default remote and test it:
lxc remote list lxc remote switch localhost lxc remote list lxc ls -
Unset
core.trust_password, for security reasons:exit # from user1 account lxc config get core.trust_password lxc config set core.trust_password "" lxc config get core.trust_password
2.3. Fix networking
Somehow, firewalld and docker interfere with the network communication in the virtual environment that we are creating, so that they cannot get an IP from DHCP, and cannot ping to the internet. The problem is that by default, an interface that is not added to any zone will be handled by the public zone of firewalld. This zone is meant for the interfaces that are connected to the internet, and is restricted by default. For example DHCP connections are not allowed.
We can fix this by adding the LXD interfaces to the zone trusted, which allows everything:
firewall-cmd --zone=trusted --list-all
firewall-cmd --permanent --zone=trusted --add-interface=lxdbr0
firewall-cmd --reload
firewall-cmd --zone=trusted --list-all
Besides this, forwarding from and to these interfaces needs to be
enabled in the firewall, but sometimes it might be blocked (for
example if you install Docker, it will set the policy of the FORWARD
chain to DROP). This can be fixed by adding a direct rule with
firewall-cmd, like this:
firewall-cmd --permanent --direct --add-rule \
    ipv4 filter FORWARD 0 -j ACCEPT
firewall-cmd --reload

firewall-cmd --direct --get-all-rules
This will enable forwarding for all the interfaces, lxdbr0 and the
ones that we will create later.
2.4. Setup Xpra
We need Xpra to access the graphical displays (VGA consoles) of the virtual machines remotely (for example from a laptop).
-
Let’s install it first (on the server):
apt install xpra virt-viewer \ tilix dbus-x11 python3-pil -
On the user account, let’s create a script for starting it:
su - user1 cat << EOF >> xpra-start.sh #!/bin/bash -x killall xpra xpra start :100 \ --start-new-commands=yes #--sharing=yes --readonly=no \ EOF chmod +x xpra-start.sh -
To access xpra remotely, we need ssh access to this account. Let’s create an ssh key:
ssh-keygen -t ed25519 -q -N '' -f xprakey s mkdir -p ~/.ssh chmod 700 ~/.ssh touch ~/.ssh/authorized_keys chmod 600 ~/.ssh/authorized_keys cat xprakey.pub >> ~/.ssh/authorized_keys -
Let’s set also the env variable
XDG_RUNTIME_DIR:echo 'export XDG_RUNTIME_DIR=$HOME/.xpra' >> ~/.bashrc echo 'export XDG_RUNTIME_DIR=$HOME/.xpra' >> ~/.profile exit -
On the client (laptop), create the script
xpra-attach.shwith a content like this:#!/bin/bash -x user=user1 server=10.11.12.13 port=2201 display=100 keyfile=$(mktemp) sed -n -e '/^----/,/^-----/p' $0 > $keyfile xpra attach ssh:$user@$server:$display \ --ssh="ssh -i $keyfile -p $port" \ --sharing=yes --readonly=no rm -f $keyfile exit 0 -----BEGIN OPENSSH PRIVATE KEY----- b3BlbnNzaC1rZXktdjEAAAAABG5vbmUAAAAEbm9uZQAAAAAAAAABAAAAaAAAABNlY2RzYS 1zaGEyLW5pc3RwMjU2AAAACG5pc3RwMjU2AAAAQQTSUZv73bV7X7SbDdbYznjw5MvNtNoo Ysvle3E3V78K7z+cl8l1SH7PAbKj6tsdCuy5jrAg50RMBzeJvWogJM2FAAAAqH+0ui1/tL otAAAAE2ViZHNhLXNoYTItbmlzdHAyNTYAAAAIbmlzdHAyNTYAAABBBNJRm/vdtXtftJsN 1tjOePDky8202ihiy+V7cTdXvwrvP5yXyXVHfs8BsqPq2x0K7LeOsCDnREwHN4m9aiAkzY UAAAAgJrRz4MHjtrsIkyaf/MG7qr2L+5Bnhvc1XaaxFT/zo38AAAANdXNlcjFAc2VydmVy MQECAw== -----END OPENSSH PRIVATE KEY-----Here
serveris the public IP (or hostname) of the server where Xpra is installed;portis the SSH port on the server;useris the account where we created the scriptxpra-start.sh;displayis the same display number that is used onxpra-start.sh; and the private key is the content of the filexprakeythat was generated on the server.
To start Xpra we run the script xpra-start.sh on the server:
su - user1
./xpra-start.sh
To connect to it we run the script xpra-attach.sh from the
client (laptop). We should get a tilix terminal by default, but if
not, we can start it from the Xpra icon (click it and keep it pressed,
then go to "Server", then to "Run a command" and release the mouse
button, type "tilix" and press Enter). From this terminal we can type
LXC commands, and when we try to access the display of a virtual
machine it will be shown on the laptop.
| See also the related section on appendix. |
3. Install the main server
3.1. Create an external switch
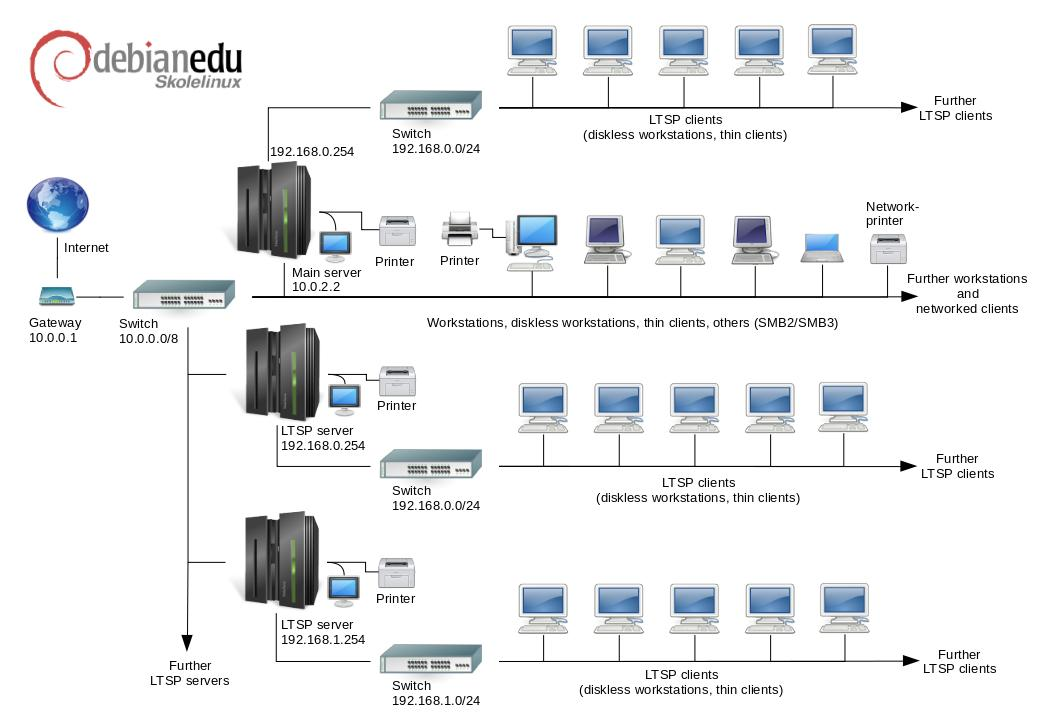
All the containers and VMs are connected by default to a bridge (usually named lxdbr0), which provides them with DHCP and allows them to connect to the internet (acting like a gateway). However we need a gateway that does not provide DHCP, since the DHCP is going to be provided by the main server. This requirement is discussed in the docs.
In LXC, a switch can be implemented by a virtual network. However we
should make sure that this virtual network does not provide DHCP and
has IP 10.0.0.1/8. We can do it like this:
lxc network list
lxc network create switch0 \
    ipv4.address=10.0.0.1/8 \
    ipv4.dhcp=false \
    ipv4.nat=true
lxc network list
lxc network show switch0
Add it also to the trusted zone of firewalld:
firewall-cmd --permanent --zone=trusted --add-interface=switch0
firewall-cmd --reload
firewall-cmd --zone=trusted --list-all
3.2. Create an internal switch
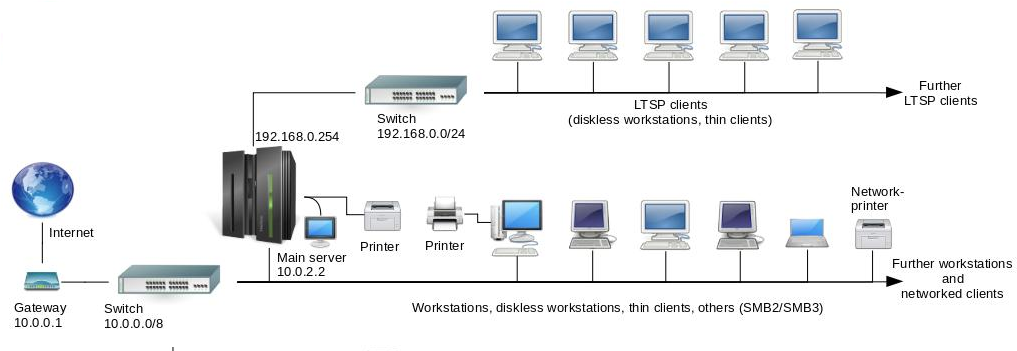
According to the topology of the network, the main server is connected to an internal switch as well, which is used for the LTSP clients. So, let’s create another switch:
lxc network list
lxc network create switch1 \
    ipv4.address=none ipv4.nat=false
lxc network show switch1
lxc network unset switch1 ipv4.address
lxc network unset switch1 ipv4.nat
lxc network show switch1
This network (switch1) should not provide DHCP, because it should be provided by the main server itself, so we have disabled it.
Let’s add it also to the trusted zone of firewalld:
firewall-cmd --permanent --zone=trusted --add-interface=switch1
firewall-cmd --reload
firewall-cmd --zone=trusted --list-all
3.3. Install from iso
3.3.1. Define a VM
lxc init main-server --empty --vm \
    --network=switch0 \
    -c limits.memory=4GB -c limits.cpu=2
lxc network attach \
    switch1 main-server
lxc config device override \
    main-server root size=60GB
With the option --network=switch0 we replace the default
network connection (which is lxdbr0) by switch0. So, the first
network interface of main-server will be connected to the switch
switch0. We also attach main-server to switch1, so it is going
to have a second network interface connected to this switch.
With the last command we also make the size of the disk bigger than the default one.
Notice (on the first command) that instead of providing an image for
the VM, we have used the option --empty, which means that
nothing will be installed by default on the disk. We need to download
the installation iso of DebianEdu and access it from the VM like a
CDROM:
wget https://get.debian.org/cdimage/release/current/amd64/iso-bd/debian-edu-11.4.0-amd64-BD-1.iso

lxc config device add \
    main-server cdrom disk \
    source=/root/debian-edu-11.4.0-amd64-BD-1.iso \
    boot.priority=1
lxc config set \
    main-server security.secureboot=false
The options boot.priority=1 and
security.secureboot=false are needed to make sure that we
actually boot the system from this iso.
lxc config device show main-server
lxc config show main-server | less
3.3.2. Install the server
Let’s start the main-server VM:
lxc start main-server --console=vgaThrough Xpra, the console of the virtual machine will be displayed on our laptop. The VM will boot from the iso that we downloaded, and we can follow the installation steps.
After finishing the installation, we should remove the cdrom device from the VM and start it again:
lxc stop -f main-server
lxc config device rm main-server cdrom
lxc config device show main-server

lxc start main-server
lxc console main-server --type=vga
3.3.3. Install the lxd-agent
The VM that we just installed from an iso cannot be managed easily
with lxc commands — some functionality is not available. For
example we cannot do lxc exec main-server — bash to get a
shell inside the VM.
To fix this, we need to install lxd-agent inside the VM. The steps
are described in
this
post, but I have written this
snippet to facilitate the installation.
From the VGA console, get a root terminal and do:
wget https://gitlab.com/-/snippets/2390048/raw/main/install-lxd-agent-in-debian.sh
chmod +x install-lxd-agent-in-debian.sh
./install-lxd-agent-in-debian.sh
rm install-lxd-agent-in-debian.sh3.4. Upgrade packages
In order to upgrade packages, first of all we need to modify
/etc/apt/sources.list. Because we installed from a CD,
it contains a source like this:
deb cdrom:[Debian GNU/Linux 11.4.0 _Bullseye_ - Official amd64 BD Binary-1 20220709-10:33]/ bullseye main
We should comment it out and make sure that it contains source lines like these:
deb http://deb.debian.org/debian bullseye main contrib non-free deb http://deb.debian.org/debian bullseye-updates main contrib non-free deb http://deb.debian.org/debian-security/ bullseye-security main contrib non-free deb http://deb.debian.org/debian/ bullseye-backports main contrib non-free
lxc exec main-server -- bash
vim /etc/apt/sources.listThen, according to these instructions, we can do:
apt update
LC_ALL=C apt full-upgrade -y
apt autoremoveWe can also do these things (optionally):
ls -ltr /etc/cfengine3/debian-edu/
LC_ALL=C cf-agent -D installation
debian-edu-ltsp-install --diskless_workstation yes| The ltsp command takes a lot of time to generate the LTSP images. |
4. Test LTSP clients
4.1. On the LTSP network
Let’s create a diskless VM, connected to switch1, that boots from the network interface:
lxc init ltsp01 --empty --vm \
--network=switch1 \
-c limits.memory=2GB -c limits.cpu=1 \
-c security.secureboot=false
lxc config device set \
ltsp01 eth0 boot.priority=1
lxc config show ltsp01 | less
lxc config device show ltsp01The last command should give an output like this:
eth0: boot.priority: "1" name: eth0 network: switch1 type: nic
| A diskless client with 1GB RAM does not work properly, so it is recommended to have at least 2GB RAM. |
Now let’s start it.
lxc start ltsp01 --console=vgaIt should start booting from the main server, through PXE, until we get the boot menu. Leave the default selection (diskless workstation) and press enter.
Stop it with: lxc stop -f ltsp01
4.2. On the main network
According to the network architecture diagram, we should be able to
start a diskless client even if it is connected to switch0. Let’s
test it:
lxc init ltsp02 --empty --vm \
--network=switch0 \
-c limits.memory=2GB -c limits.cpu=1 \
-c security.secureboot=false
lxc config device set \
ltsp02 eth0 boot.priority=1
lxc config show ltsp02
lxc start ltsp02 --console=vga
lxc stop -f ltsp024.3. Test a thin client
On a diskless workstation, programs and applications run on the RAM of the client. For example when we start Firefox, it is loaded on the RAM of the client. Only the home directory is on the server (mounted with NFS).
On a thin client, on the other hand, everything runs on the server, only the display is shown to the client. For this reason we don’t need much RAM for a VM that simulates a thin client.
lxc init ltsp03 --empty --vm \
--network=switch1 \
-c limits.memory=512MB \
-c security.secureboot=false
lxc config device set \
ltsp03 eth0 boot.priority=1
lxc config show ltsp03
lxc start ltsp03 --console=vga
lxc stop -f ltsp03It would still work with -c limits.memory=256MB. By the way,
the default value for this option is 1GB.
5. Test workstations
5.1. Install a workstation
Let’s create an empty VM, with 25GB disk, connected to the main switch (switch0), which boots from the network:
lxc init ws01 --empty --vm \
--network=switch0 \
-c limits.memory=2GB \
-c security.secureboot=false
lxc config device override \
ws01 root size=25GB
lxc config device set \
ws01 eth0 boot.priority=1
lxc config show ws01
lxc start ws01 --console=vgaOn the iPXE boot menu select the first option (Install Debian Edu/amd64b). Then follow the installation steps and select the Workstation profile (which is selected by default).
After installation is done, shut it down, remove the boot priority from the network interface, and start it again:
lxc stop -f ws01
lxc config device unset ws01 eth0 boot.priority
lxc config show ws01
lxc start ws01 --console=vgaWe can login as user root, get a terminal, and install lxd-agent
like this:
wget https://t.ly/QCLN -O install-lxd-agent.sh
less install-lxd-agent.sh
chmod +x install-lxd-agent.sh
./install-lxd-agent.sh
rm install-lxd-agent.shNow that we installed lxd-agent, we can access ws01 with the
command lxc exec ws01 — bash.
5.2. Connect workstation to the main server
The DHCP of the main server can assign a hostname and a fixed IP to
this workstation, but we need to register it first on GOsa. We can
open the web interface of GOsa, go to "Systems" and add a workstation
manually, but a more convenient way is to use the tool
sitesummary2ldapdhcp from the server, like this:
sitesummary2ldapdhcp -a -i ether-00:16:3e:8a:fd:83Here we are using the MAC address of the workstation, which we can find with a command like this:
# lxc exec ws01 -- ip link show eth0
lxc exec ws01 -- cat /sys/class/net/eth0/address
The command sitesummary2ldapdhcp is going to ask for the
root password, and it will add a workstation entry on LDAP.
However this entry needs to be modified/customized. So, open it on
GOsa and modify it as shown in the figure.
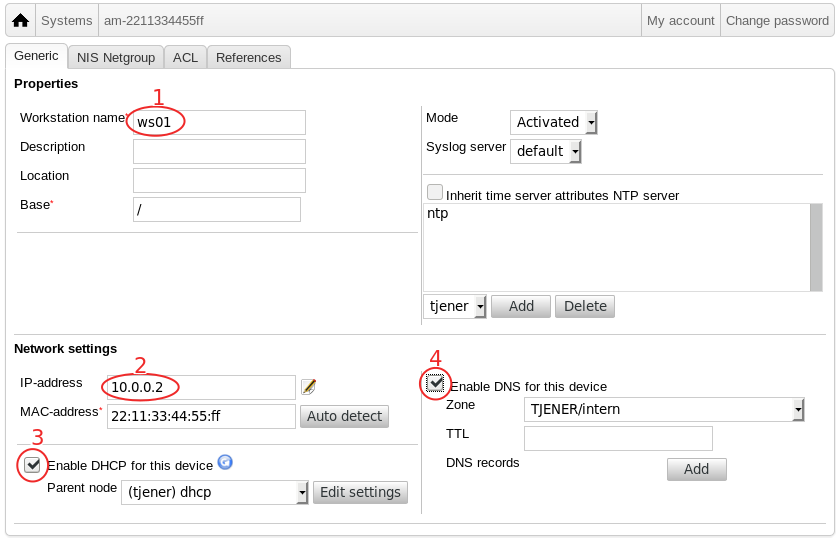
Now you can reboot the workstation and it will take the IP and hostname specified in GOsa.
If you notice that the workstation does not get the specified
hostname and IP, try the command ldap2bind to update DNS
manually. Normally this command is executed from a cron job every
hour.
|
However we can still login only as root, not as any user that is registed in Gosa. To enable this, we need to run this command on the workstation:
/usr/share/debian-edu-config/tools/copy-host-keytabIt is going to ask for the root password of the server, in order to copy the keytab file from the server to the workstation.
Now we can reboot the workstation and test that we are able to login as any user that is registered in GOsa. The home directory of the user is also mounted from the server.
6. Test a roaming workstation
A roaming workstation is similar to a workstation, except that you can use it outside the school network as well. For example a laptop that you can use both at school and at home. A roaming workstation works by caching in the local machine the authentication credentials and the home directory of the user.
-
Installation is exactly the same as that of a workstation, except that you choose the Roaming Workstation profile, instead of the Workstation profile.
lxc init ws02 --empty --vm \
    --network=switch0 \
    -c limits.memory=2GB \
    -c security.secureboot=false
lxc config device override \
    ws02 root size=25GB
lxc config device set \
    ws02 eth0 boot.priority=1

lxc config show ws02
lxc start ws02 --console=vga
On the iPXE boot menu select the first option (Install Debian Edu/amd64b). Then follow the installation steps and select the Roaming Workstation profile.
-
After installation is done, shut it down, remove the boot priority from the network interface, and start it again:
lxc stop -f ws02 lxc config device unset ws02 eth0 boot.priority lxc config show ws02 lxc start ws02 --console=vga -
Login as user
root, get a terminal, and install lxd-agent:wget https://t.ly/QCLN -O install-lxd-agent.sh less install-lxd-agent.sh chmod +x install-lxd-agent.sh ./install-lxd-agent.sh rm install-lxd-agent.sh -
Add this workstation to LDAP, on the main server:
# lxc exec ws02 -- ip link show eth0
lxc exec ws02 -- cat /sys/class/net/eth0/address
sitesummary2ldapdhcp -a -i ether-00:16:3e:8a:fd:83
Edit it from the GOsa interface, set a hostname, an IP, etc. Run also
ldap2bindto update DNS manually. -
Copy the keytab file from the server to the workstation:
lxc exec ws02 -- bash /usr/share/debian-edu-config/tools/copy-host-keytab exit -
Reboot the workstation and check that you can login as a normal user (not as root):
lxc stop -f ws02 lxc start ws02 --console=vga -
Change the network of the workstation (use a network that is different from switch0, which is the school network). Then boot it and test that you can login with the same user as before:
lxc stop -f ws02
lxc config device show ws02
lxc config device set ws02 eth0 network lxdbr0
lxc config device show ws02
lxc start ws02 --console=vga
| With a Roaming Workstation, once you login on a school network, a local user account is created on the workstation, with a local home directory. If you login with the same username from an LTSP client or from a normal Workstation, then you will access the home directory on the server, which has a different content from the one on the Roaming Workstation. |
7. Separate LTSP server
An extra LTSP server is installed outside the main server. It is useful for isolating the LTSP traffic from the rest of the network. An LTSP server has two network interfaces, one connected to the main switch, and the other connected to an internal switch, where all the LTSP clients are connected as well.
The installation of an LTSP server is very similar to the installation of a workstation, except that the profile "LTSP Server" is selected instead. After installation, the LTSP server must be connected to the main server the same way as a workstation. Then, some extra steps need to be done for generating the client images, PXE menu, etc.
-
Let’s create first an internal switch, named
switch2, that does not provide DHCP or gateway:lxc network list lxc network create switch2 \ ipv4.address=none ipv4.nat=false lxc network show switch2 lxc network unset switch2 ipv4.address lxc network unset switch2 ipv4.nat lxc network show switch2 -
Now let’s create a VM and install it from the network. Installation is exactly the same as that of a workstation, except that we choose the LTSP Server profile.
lxc init ltsp-server-1 --empty --vm \
    --network=switch0 \
    -c limits.memory=4GB \
    -c security.secureboot=false
lxc network attach \
    switch2 ltsp-server-1
lxc config device override \
    ltsp-server-1 root size=40GB
lxc config device set \
    ltsp-server-1 eth0 boot.priority=1

lxc config show ltsp-server-1
lxc start ltsp-server-1 --console=vga
On the iPXE boot menu select the first option (Install Debian Edu/amd64b). Then follow the installation steps and select the LTSP Server profile.
-
After installation is done, shut it down, remove the boot priority from the network interface, and start it again:
lxc stop -f ltsp-server-1 lxc config device unset ltsp-server-1 eth0 boot.priority lxc config show ltsp-server-1 lxc start ltsp-server-1 --console=vga -
Login as user
root, get a terminal, and install lxd-agent:wget https://t.ly/QCLN -O install-lxd-agent.sh less install-lxd-agent.sh chmod +x install-lxd-agent.sh ./install-lxd-agent.sh rm install-lxd-agent.sh -
Add this system to LDAP, on the main server:
# lxc exec ltsp-server-1 -- ip link show eth0
lxc exec ltsp-server-1 -- cat /sys/class/net/eth0/address

lxc exec main-server -- bash
sitesummary2ldapdhcp -a -i ether-00:16:3e:8a:fd:83
Edit it from the GOsa interface, set a hostname, an IP, etc. Run also
ldap2bindto update DNS manually. -
Reboot the machine and copy the keytab file from the server, then reboot it again:
lxc stop -f ltsp-server-1 lxc start ltsp-server-1 lxc exec ltsp-server-1 -- bash /usr/share/debian-edu-config/tools/copy-host-keytab exit lxc stop -f ltsp-server-1 lxc start ltsp-server-1 -
Generate a SquashFS image (server filesystem) for the diskless clients, and install PXE:
lxc exec ltsp-server-1 -- bash
debian-edu-ltsp-install --diskless_workstation yes
debian-edu-pxeinstall
exit
The command that generates the image takes a long time. We need another reboot:
lxc stop -f ltsp-server-1
lxc start ltsp-server-1
Now let’s start a diskless client on the internal LAN of ltsp-server-1:
lxc init ltsp04 --empty --vm \
    --network=switch2 \
    -c limits.memory=2GB -c limits.cpu=1 \
    -c security.secureboot=false
lxc config device set \
    ltsp04 eth0 boot.priority=1
lxc config device show ltsp04
lxc start ltsp04 --console=vga
We should be able to boot from the network, then authenticate with GOsa user accounts, and access the home directories that are stored on the main server.
8. Misc
8.1. Modify iPXE boot menu
If we want, for example, to remove the i386 installation option from
the boot menu, we can edit /srv/tftp/ltsp/ltsp.ipxe on the
main server and comment out this line:
# item --key i i386 Install Debian Edu/i386 (32-Bit)If we want to change the desktop that is installed on the workstations, for example to LXQT, we can edit this part:
# Based upon locale, keymap and desktop values used during main-server installation; auto URL added.
:amd64
set params auto url=http://www/debian-edu-install.dat hostname=pxeinstall domain=intern  locale=en_US.UTF-8 keymap=us desktop=lxqt vga=788 --- quiet
kernel /debian-installer/amd64/linux initrd=initrd.gz ${params}
initrd /debian-installer/amd64/initrd.gz
boot || goto failed
Other kernel options can be changed here as well, like the locale, keyboard keymap, etc.
The preseeding file that is used for installing workstations is
/etc/debian-edu/www/debian-edu-install.dat. However the
changes made there will be lost if we use
debian-edu-pxeinstall. In order to make persistent changes we
should add additional debconf values to the file
/etc/debian-edu/www/debian-edu-install.dat.local.
8.2. Add another thin client type
Let’s try to add another thin client type:
debian-edu-ltsp-install --thin_type desktopThis will create a chroot and SquashFS image for 32bit clients. The type of the thin client will be a minimal desktop with Mozilla and X2Go client. The iPXE menu will also be updated with a couple of new menu items.
For more details see:
man debian-edu-ltsp-install8.3. Install Epoptes
Epoptes is a computer lab management and monitoring tool. We can install it on the main-server like this
apt-get install --install-recommends epoptes
apt-get install --install-recommends epoptes-client
echo 'SERVER=tjener' >  /etc/default/epoptes-client
Don’t run epoptes-client -c
|
The configuration of epoptes-client (SERVER=tjener) tells the
clients to connect to the main-server, which means that we can access
the Epoptes application only on the main-server.
We need to propagate these changes to the image of the diskless clients:
debian-edu-ltsp-install --diskless_workstation yesWe also need to add to the group "epoptes" all the teachers that
should be able to access the Epoptes application. We can do this from
the GOsa interface, first by creating a new group named epoptes,
with a fixed gid, and by adding to this group all the teachers.
8.4. Backup management
It can be done from https://www/slbackup-php, but there is a catch: you cannot login without enabling root login on SSH:
-
Edit
/etc/ssh/sshd_configand make sure that these settings are enabled:PermitRootLogin yes PasswordAuthentication yes
-
Restart the sshd service:
systemctl restart sshd
| As soon as you are done with accessing the slbackup-php interface, you should switch back those two options, for security reasons. |
I would recommend not to use the web interface at all. Instead, try to
edit directly: /etc/slbackup/slbackup.conf. Also, try to learn
how to use rdiff-backup, since this is the tool that is being
used under the hood: man rdiff-backup.
8.4.1. Remote backup
Let’s say that we want to save the backups to a remote server, for
example on ws02. We have to make sure that rdiff-backup is
installed on the remote server as well, and we have to settup a
passwordless SSH connection between the main server and the backup
server.
-
Install
rdiff-backupon the backup server:apt install rdiff-backup -
Create an ssh keypair:
ssh-keygen -t ed25519 -q -N '' -f backup -
Append the public key (
backup.pub) to~/.ssh/authorized_keys, on the backup server:mkdir -p ~/.ssh chmod 700 ~/.ssh touch ~/.ssh/authorized_keys chmod 600 ~/.ssh/authorized_keys cat backup.pub >> ~/.ssh/authorized_keys -
On the main server, add the backup server to the SSH config file:
touch ~/.ssh/config
chmod 600 ~/.ssh/config

cat >> ~/.ssh/config <<EOF
Host ws02
    HostName ws02
    Port 22
    User root
    IdentityFile ~/.ssh/backup.key
    IdentitiesOnly yes
EOF

mv backup ~/.ssh/backup.key
chmod 600 ~/.ssh/backup.key
Now you should be able to login without a password:
ssh ws02 -
Edit
server_addressetc. on/etc/slbackup/slbackup.conf:server_address ws02 server_destdir /skole/backup server_type remote server_user root
-
Make sure that the directory
/skole/backupexists on the backup server:mkdir -p /skole/backup -
To test that the backup is performed correctly run manually
/usr/share/slbackup/slbackup-cron(usually it is run by a cron job every night).
8.5. Resize partitions
If we check monitoring tools (from the first user account),
https://www/munin/ and https://www/icingaweb2/, we will notice that
some partitions are low on free disk space. By default, the
installation does not use all of the available disk space, leaving
some unused disk space, which can be later used to enlarge/resize the
partitions that are low on disk space. This resize is done
automatically for all the systems that are added to the netgroup
fsautoresize-hosts. There is an hourly cron job that runs the
command debian-edu-fsautoresize -n, which apply the rules on
/usr/share/debian-edu-config/fsautoresizetab.
However the virtual machines that we use for testing have a minimal disk space, so there is not much backup space on them. Let’s try to enlarge them manually, and then see how to resize a partition.
8.5.1. Enlarge the virtual disk
-
The disk of the main server is 60GB:
lxc config device show main-server -
Let’s make it 70GB:
lxc config device set main-server root size 70GB lxc config device show main-server lxc restart main-server lxc exec main-server -- parted /dev/sda print -
We need to grow the partition
/dev/sda3so that it uses all the available disk space:lxc exec main-server -- bash apt install cloud-guest-utils growpart /dev/sda 3 # there is a space before 3 parted /dev/sda print apt purge cloud-guest-utils -
Resize the physical volume that is based on
/dev/sda3:pvdisplay pvresize --test /dev/sda3 pvresize /dev/sda3 pvdisplay
8.5.2. Resize LVs
Let’s enlarge the logical volume of /usr from 15GB to 17GB:
df -h /usr
lvdisplay /dev/mapper/vg_system-usr
lvextend -L17GB /dev/mapper/vg_system-usr
lvdisplay /dev/mapper/vg_system-usr

df -h /usr
resize2fs /dev/mapper/vg_system-usr
df -h /usr
Let’s also enlarge the cache partition of squid:
df -h
lvdisplay /dev/mapper/vg_system-var+spool+squid
lvextend -L+5GB /dev/mapper/vg_system-var+spool+squid
lvdisplay /dev/mapper/vg_system-var+spool+squid

df -h /dev/mapper/vg_system-var+spool+squid
resize2fs /dev/mapper/vg_system-var+spool+squid
df -h /dev/mapper/vg_system-var+spool+squid
For the case of the proxy cache partition, we need to update as well the value of the cache size in the configuration:
grep cache_dir /etc/squid/conf.d/debian-edu.conf
/usr/share/debian-edu-config/tools/squid-update-cachedir
grep cache_dir /etc/squid/conf.d/debian-edu.conf
9. Appendices
9.1. Connect to LXD remotely
We can connect to the LXD from a local machine, for example a laptop, and manage it remotely.
-
Install LXD on the local machine (without initializing it with
lxc init):apt install snapd snap install lxd --channel=latest/stable snap list lxc list -
Enable remote connection on the server:
lxc config set core.https_address "[::]" lxc config set core.trust_password some-password -
The port
8443on the server should be open as well:firewall-cmd --zone=public --add-port=8443/tcp --permanent firewall-cmd --reload firewall-cmd --zone=public --list-ports -
On the local machine add a remote, like this:
lxc remote add lxd1 11.12.13.14This will prompt you to confirm the remote server fingerprint and then ask you for the password.
-
Make it the default remote and test it:
lxc remote list
lxc remote switch lxd1
lxc remote list
lxc ls
Now all the
lxccommands on the laptop will be executed by default on the remote LXD server. -
Once we can connect remotely to the LXD server, we should unset
core.trust_passwordon the server, for security reasons:lxc config get core.trust_password lxc config set core.trust_password "" lxc config get core.trust_password -
On the client machine (laptop) install also
virt-viewer(orspice-client-gtk), which is needed to access the VGA console of the virtual machines:apt install virt-viewerBe aware that without Xpra, the GUI interface displayed by virt-vieweris not smooth but slow and lagish.
9.2. Setup Xpra
We can use Xpra in order to access the VGA console of a virtual machine remotely. We need to install it both on the server and on the client (on the laptop):
apt install xpraOn the server we also need to install the package virt-viewer (which
provides remote-viewer) and some other required packages:
apt install virt-viewer \
            tilix dbus-x11 python3-pil
Then we can start Xpra on the server, like this:
xpra start :7
DISPLAY=:7 tmux
Instead of 7 you can use any other port for the display.
|
From the client, we can attach to the Xpra server like this:
xpra attach ssh:user@example.com:7Now, from the tmux on the server we can start any GUI application,
and it will be displayed on the local machine.
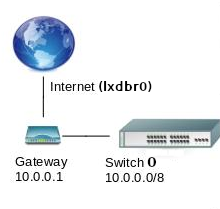
9.3. Install the gateway
All the containers and VMs are connected by default to a bridge (usually named lxdbr0), which provides them with DHCP, DNS, and allows them to connect to the internet (acting like a gateway). However we need a gateway that does not provide DHCP, since the DHCP is going to be provided by the main server. This requirement is discussed in the docs. So, we are going to build a VM for the gateway, as shown in the network topology diagram.
This gateway needs to be connected to lxdbr0 (which provides access to the internet) and to another switch, which connects it to the main server and to the LTSP servers. Let’s call it switch0.
9.3.1. Create switch0
In LXC, a switch can be implemented by a virtual network. However we should make sure that this virtual network does not provide DHCP and does not act as a gateway for the VMs that are connected to it (by default it does). We can do it like this:
lxc network list
lxc network create switch0 --type=bridge
lxc network show switch0
lxc network unset switch0 ipv4.address
lxc network unset switch0 ipv4.nat
lxc network show switch0
9.3.2. Create the virtual machine
Now let’s create the gateway VM:
lxc init images:debian/11 gateway --vm
lxc network attach switch0 gateway
lxc start gateway
lxc ls
By default it is connected to lxdbr0, but we are also connecting it to switch0.
9.3.3. Fix the configuration
Let’s fix the configuration of the virtual machine so that it serves as a gateway:
-
Set IP
10.0.0.1to the second (internal) interface:lxc exec gateway -- bash ip addr cat <<EOF > /etc/systemd/network/enp6s0.network [Match] Name=enp6s0 [Network] Address=10.0.0.1 DNS=10.0.2.2 EOF systemctl restart systemd-networkd ip addr -
Make sure that the hostname is
gateway:hostname gateway hostname > /etc/hostname -
Enable masquerading using firewalld:
apt install firewalld
firewall-cmd --permanent --zone=external --add-interface=enp5s0
firewall-cmd --permanent --zone=dmz --add-interface=enp60
firewall-cmd --reload
9.4. Install main-server from a base image
When we start the installation from a base debian image (provided by the LXD infrastructure), it is faster and more convenient. One reason is that the base image already has the LXD agent installed by default, which makes its management easier. Another reason is that the installation process becomes scriptable (no manual intervention needed) and this is more suitable for testing purposes.
So, let’s see also how to install a main-server starting from a base debian image.
9.4.1. Create a VM
First let’s stop the current main-server, so that it doesn’t interfere with the new one, and let’s call the new server main-server-1:
lxc stop -f main-server

lxc init images:debian/11 main-server-1 --vm \
    --network=switch0 \
    -c limits.memory=4GB -c limits.cpu=2
lxc network attach switch1 main-server-1
lxc config device override main-server-1 root size=100GB
lxc start main-server-1

lxc ls
lxc exec main-server-1 -- bash
ip addr
ip ro
9.4.2. Fix the network configuration
The default network configuration of the image is to get the settings by DHCP, but there is no DHCP server connected to switch0, as a result there is no network configuration.
lxc exec main-server-1 -- bash
ls /etc/systemd/network
cat /etc/systemd/network/enp5s0.network
We need to fix this, before we can continue with other installations and configurations:
cat <<EOF > /etc/systemd/network/enp5s0.network
[Match]
Name=enp5s0
[Network]
Address=10.0.2.2/8
Gateway=10.0.0.1
DNS=8.8.8.8
EOF

systemctl restart systemd-networkd

ip addr
ip ro
ping 8.8.8.8
ping google.com
9.4.3. Resize the filesystem
If you check the size of the filesystem, you will notice that it is much smaller than the size that we have allocated to the VM:
df -h .
df -h
This is the size of the base image. We have to enlarge the size of the filesystem to fill all the available disk space:
apt install fdisk cloud-guest-utils
df -h .
growpart /dev/sda 2    # notice the space in front of 2; it is not a typo
resize2fs /dev/sda2    # no space in this case
df -h .
apt purge fdisk cloud-guest-utils
apt autoremove
9.4.4. Install the Main-Server profile
Now we get the package debian-edu-config which contains
installation/configuration scripts, and perform an installation of the
profile Main-Server:
apt install debian-edu-config
cd /usr/share/debian-edu-config/

#PROFILE=Main-Server DESKTOP=none bash -x tools/debian-edu-bless
PROFILE=Main-Server,Workstation DESKTOP=lxde bash -x tools/debian-edu-bless

# add also a user
adduser user1

# set a password for the root
passwd

# reboot
exit
lxc stop main-server-1
lxc start main-server-1
Now we can access its desktop:
lxc console main-server-1 --type=vga9.5. Automount CDROM on thin clients
When you attach a removable device (USB, CDROM) to a diskless client, it will be automounted and be available on the client immediately, since the system is running on the client and has direct access to its hardware.
With an X2Go thin client it is not so easy because we are accessing the server remotely. There is already a configuration for the USB devices, which attaches them as network disks to the X2Go client, and makes them accessable via SSHFS. So, whenever a USB device is attached to a client machine, it will be automounted, and we can click the icon labeled "_usb0 (sshfs-disk)" on the desktop in order to access it. In this case we are actually accessing it remotely from the server, since everything on a thin client runs on the server.
If we want to do the same for a CDROM device, then we can follow the instructions described below.
-
Create the file
/etc/ltsp/autofs/auto.cdromon the LTSP server with this single line as content:/cdrom -fstype=iso9660,ro,nosuid,nodev :/dev/cdrom
-
Add this line to
/etc/ltsp/autofs/extra.autofs:/- /etc/auto.cdrom --mode=0777 --timeout=3
-
Add cdrom export (adjust one line) in
/etc/ltsp/skel/.x2goclient/sessions:export="/usb0:1;/cdrom:1;"
-
Run
debian-edu-ltsp-initrdfor the changes to take effect for the next start of a thin client.
We can test that it works like this:
-
Create a thin client VM:
lxc init ltsp04 --empty --vm \ --network=switch1 \ -c limits.memory=512MB \ -c security.secureboot=false lxc config device set \ ltsp04 eth0 boot.priority=1 lxc config show ltsp04 -
Start it:
lxc start ltsp04 --console=vgaOn the iPXE menu select the option "Plain X2Go Thin Client (64-Bit)".
-
Attach a CDROM to this VM:
lxc config device add \ ltsp04 cdrom disk \ source=/root/debian-edu-11.4.0-amd64-BD-1.iso -
Check that you can access the content of the CDROM by clicking on the icon labeled "_cdrom (sshfs-disk)".
-
Remove the CDROM device:
lxc config device rm ltsp04 cdrom -
Check that the content of the CDROM is empty.