Testing FUSS with Incus
1. About FUSS
FUSS is a GNU/Linux distribution based on Debian, for a Digitally Sustainable School. It includes all the software that is needed to create a computer lab: server, client and standalone machines, with centralized user authentication and home directories.
2. Server setup
Because I don’t have resources for testing it locally, I got a dedicated root server on Hetzner, and tried to test FUSS with virtual machines, virtual LANs etc. I use Incus to manage containers and virtual machines on this server.
| Incus is a community fork of LXD (which is owned by Canonical). |
For details about how to install and setup such a server see:
3. Create virtual LANs
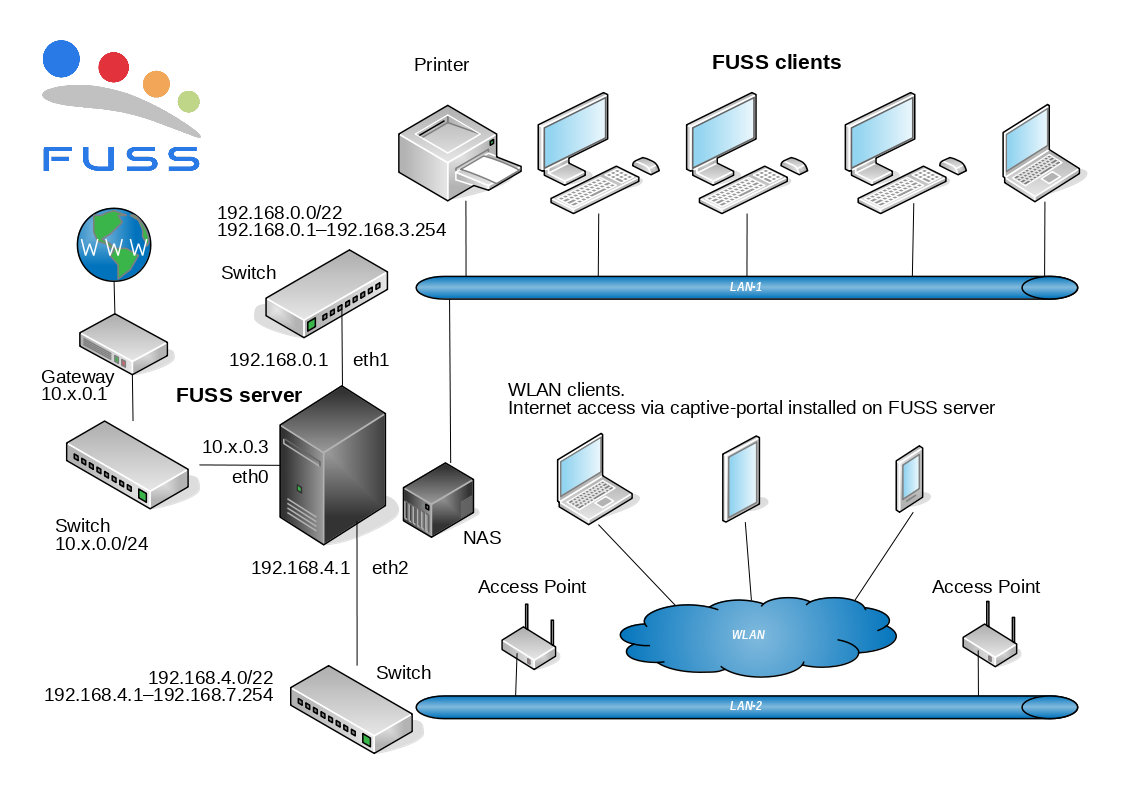
All the containers and VMs are connected by default to a bridge (usually named incusbr0), which provides them with DHCP, DNS, and allows them to connect to the internet. It acts like a gateway for the VMs.
But we also need another virtual LAN for the FUSS clients, and another
one for the Access Points. Let’s call them LAN1 and LAN2. These
LANs should not provide DHCP and should not act as a gateway for the
VMs, because this should be done by the FUSS server.
incus network list
incus network create LAN1 \
    ipv4.address=none ipv4.nat=false
incus network show LAN1
incus network unset LAN1 ipv4.address
incus network unset LAN1 ipv4.nat
incus network unset LAN1 ipv6.address
incus network unset LAN1 ipv6.nat
incus network show LAN1

incus network list
incus network create LAN2 \
    ipv4.address=none ipv4.nat=false
incus network show LAN2
incus network unset LAN2 ipv4.address
incus network unset LAN2 ipv4.nat
incus network unset LAN1 ipv6.address
incus network unset LAN1 ipv6.nat
incus network show LAN2
Let’s also add them to the trusted zone of firewalld:
firewall-cmd --permanent --zone=trusted --add-interface=LAN1
firewall-cmd --permanent --zone=trusted --add-interface=LAN2
firewall-cmd --reload
firewall-cmd --zone=trusted --list-all
4. Install the FUSS server
We are going to install it from scratch, starting from a basic Debian installation (instead of using a pre-installed FUSS image to build a virtual machine, inside proxmox).
4.1. Create a VM
incus init fuss-server --empty --vm \
    --network=incusbr0 \
    -d root,size=100GB \
    -c limits.memory=4GB -c limits.cpu=2
incus network attach LAN1 fuss-server eth1 eth1
incus network attach LAN2 fuss-server eth2 eth2
By default, the VM is connected to the network incusbr0, which also allows it to access the internet. We also attach fuss-server to LAN1 and LAN2, so it is going to have two more network interfaces connected to these LANs.
With the last command we also make the size of the disk bigger than the default one.
Notice (on the first command) that instead of providing an image for
the VM, we have used the option --empty, which means that
nothing will be installed by default on the disk. We need to download
the
installation
iso of Debian 12 ("bookworm") and attach it to the VM like a CDROM:
wget https://cdimage.debian.org/debian-cd/current/amd64/iso-cd/debian-12.5.0-amd64-netinst.iso

incus config device add \
    fuss-server cdrom disk \
    source=$(pwd)/debian-12.5.0-amd64-netinst.iso \
    boot.priority=1
incus config set \
    fuss-server security.secureboot=false
The options boot.priority=1 and
security.secureboot=false are needed to make sure that we
actually boot the system from this iso.
incus config device show fuss-server
incus config show fuss-server | less
4.1.1. Install the server
Let’s start the fuss-server VM:
incus start fuss-server --console=vga| We should run this command on a terminal that we access through Xpra, so that the console of the virtual machine is displayed on our local machine (laptop). |
The VM will boot from the iso that we downloaded, and we can follow the installation steps. This section of the FUSS docs has more details about the selections during installation: https://fuss-tech-guide.readthedocs.io/it/latest/quick-install.html#configurazioni-iniziali
After finishing the installation, we should remove the cdrom device from the VM and start it again:
incus stop -f fuss-server
incus config device rm fuss-server cdrom
incus config device show fuss-server

incus start fuss-server
incus console fuss-server --type=vga
4.1.2. Install the incus-agent
The VM that we just installed from an iso cannot be managed easily
with incus commands — some functionality is not available. For
example we cannot do incus shell fuss-server to get a shell
inside the VM.
To fix this, we need to install incus-agent inside the VM. From
the VGA console, get a root terminal and do:
mount -t 9p config /mnt
cd /mnt
./install.sh
cd
umount /mnt
systemctl start incus-agent
4.2. Setup LAN1 interface
Append these lines to /etc/network/interfaces:
cat <<EOF >> /etc/network/interfaces

# LAN1
allow-hotplug enp6s0
iface enp6s0 inet static
      address 192.168.0.1
      netmask 255.255.255.0
      network 192.168.0.0

EOF
Then activate this interface:
ip addr
ifup enp6s0
ip addr
4.3. Install fuss-server
The custom package fuss-server contains the scripts that are needed
to do the installation and configuration of the server.
First of all, append these line to /etc/apt/sources.list:
cat <<EOF >> /etc/apt/sources.list

deb http://deb.debian.org/debian/ bookworm-backports main
deb [signed-by=/usr/share/keyrings/fuss-keyring.gpg] http://archive.fuss.bz.it/ bookworm main

EOF
Then add the key:
apt install gnupg
wget -qO \
    /usr/share/keyrings/fuss-keyring.gpg \
    https://archive.fuss.bz.it/apt.gpg
Finally install the package:
apt update
apt install fuss-server
4.4. Configuration
fuss-server --help
fuss-server configure
cat /etc/fuss-server/fuss-server.yaml
fuss-server create
The create command will run the Ansible scripts that are needed to
install and configure the rest of the system.
For more explanations and details see: https://fuss-tech-guide.readthedocs.io/it/latest/server/configurazione_server.html#configurazione-fuss-server
5. Install a FUSS client
We are going to install first the latest version of the Debian 12 Xfce live ISO, which can be downloaded from here: https://cdimage.debian.org/mirror/cdimage/release/current-live/amd64/iso-hybrid/
debarchive="https://cdimage.debian.org"
path="mirror/cdimage/release/current-live/amd64/iso-hybrid"
wget "$debarchive/$path/debian-live-12.5.0-amd64-xfce.iso"
More details about how to install a client are available at the technician’s manual.
5.1. Create a VM
Create an empty VM, connected to LAN1:
incus init client1 \
    --empty --vm \
    --network=LAN1 \
    -d root,size=40GB \
    -c limits.memory=2GB \
    -c limits.cpu=2
Attach the iso file as a device of type disk, and make it the first boot option. Disable also secureboot:
incus config device add client1 cdrom \
    disk source=$(pwd)/debian-live-12.5.0-amd64-xfce.iso \
    boot.priority=1
incus config set client1 security.secureboot=false
Check its config:
incus config device show client1
incus config show client1 | less
5.2. Install it
Start it with a VGA console:
incus start client1 --console=vgaComplete the installation.
During the installation, use http://proxy:8080 as HTTP Proxy,
because this client is on the LAN behind the FUSS server, and the
server has installed squid and uses it as a proxy.
|
Stop the client, remove the iso device, and start it again:
incus stop -f client1
incus config device remove client1 cdrom
incus config device show client1
incus start client1
incus console client1 --type=vga
Login as root and install the Incus agent:
mount -t 9p config /mnt
cd /mnt
./install.sh
cd
umount /mnt
systemctl start incus-agent
5.3. Install fuss-client
incus shell client1

cat <<EOF >> /etc/apt/sources.list

deb [signed-by=/usr/share/keyrings/fuss-keyring.gpg] http://archive.fuss.bz.it/ bookworm main
deb http://httpredir.debian.org/debian bookworm-backports main

EOF

apt install wget
export http_proxy=http://proxy:8080
export https_proxy=http://proxy:8080
wget -qO /usr/share/keyrings/fuss-keyring.gpg https://archive.fuss.bz.it/apt.gpg

apt update

cat <<EOF >> /etc/apt/apt.conf.d/no-bookworm-firmware.conf
APT::Get::Update::SourceListWarnings::NonFreeFirmware "false";
EOF

apt update
apt upgrade
apt dist-upgrade

apt install fuss-client
apt install systemd-timesyncd screen
5.4. Client configuration
Configuration of the client is done with the command fuss-client:
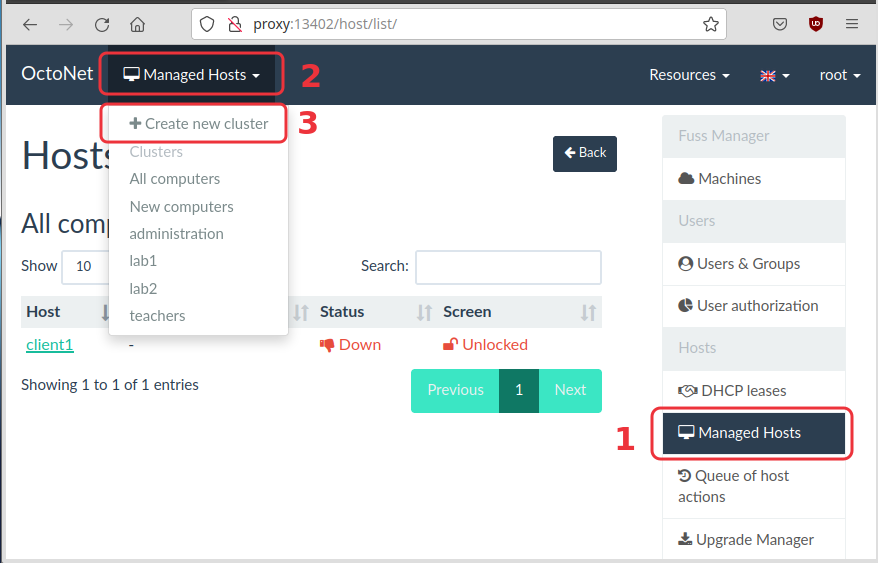
fuss-client --helpHowever, before starting the configuration, we need to know in which
cluster/group of computers this client belongs to. Actually we haven’t
defined yet any clusters. One way for doing it is through the Octonet
web interface. Open in browser http://proxy:13402 and login with
username root and the master password defined on the configuration
of the server (it is not the password of the root account on the
server). Then click on "Managed Hosts" on the right, click on "Managed
Hosts" on the top, and select "Create new cluster" from the menu.
Let’s say that the name of this cluster is lab1. Now we can setup
the client like this:
fuss-client -a -g lab1 -H client1 --lightThe option -a is for adding a new client. The option -g
is for the group/cluster of computers where this client belongs to.
The option -H sets the hostname. The option --light will
make a basic installation; without this option lots of educationsl
programs will be installed (and right now we don’t want to do it,
since we are just testing).
5.5. Fix the screen resolution
Let’s also fix the screen resolution of the client (because it gets automatically a very big resolution):
sed -i /etc/fuss-client/display-setup-script/setDisplayResolution \
    -e 's/autorandr/#autorandr/'
sed -i /etc/fuss-client/display-setup-script/setDisplayResolution \
-e '/#autorandr/a xrandr -s 1280x800'| This is needed only when testing with INCUS VMs. When installation is done on a real machine, most probably this issue does not happen. |
6. Manage user accounts
User management is centralized, and it can be done from the web
interface of OctoNet, at http://proxy:13402/ . Login as root, using
the master password given during the configuration of the
fuss-server.
6.1. Add new users
Open the OctoNet interface (on http://proxy:13402/) and add a couple
of new users, for example user1 and user2.
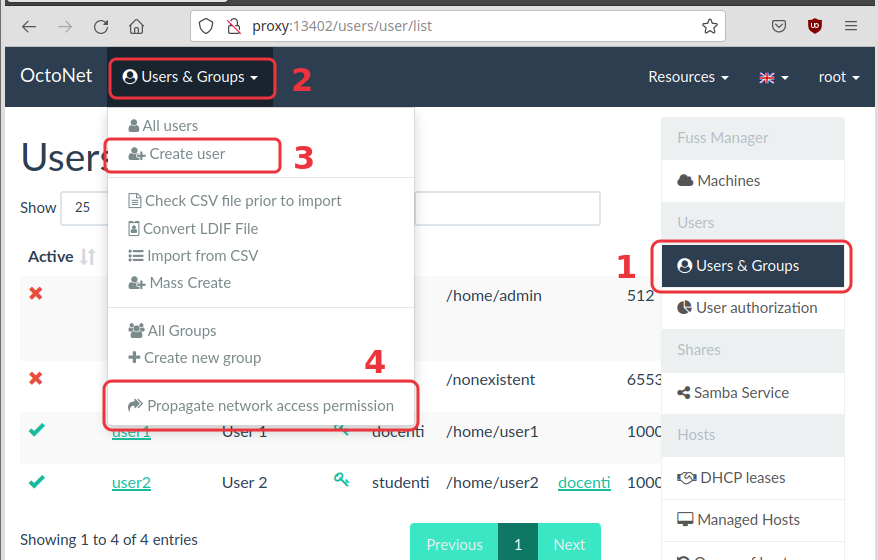
| Don’t forget to click the "Propagate" button, after creating the new users. |
Now restart the client and try to login with each of them:
incus stop -f client1
incus start client1 --console=vga
Note that when you try to open a web site, the proxy asks you to authenticate with a username and password. Use the same username and password that you used to login to your account.
6.2. Add users from CSV
Create a CSV file like this:
cat <<EOF > user-list.csv
User 001,user001,pass001,studenti
User 002,user002,pass002,studenti
User 003,user003,pass003,studenti
User 004,user004,pass004,studenti
User 005,user005,pass005,studenti
EOF
In this example, the first column is the full name, the second one is the username, the third one is the password, and the last column is the primary group. The order of the columns does not matter because it can be fixed during the import.
There is an option in the menu for checking the file before importing it. After the check you can start importing.
For more details about creating accounts from CSV files, look at the corresponding docs.
7. Using Clonezilla
7.1. Save a client image
To start Clonezilla on client1, we have to boot it from the LAN. We
need to disable secure boot and to set the network interface as the
first boot device:
incus config set client1 security.secureboot=false
incus config device show client1
incus config device set client1 eth0 boot.priority=1
incus config device show client1
incus stop client1 --force
incus start client1 --console=vga
In case the mouse is locked, press Shift_L + F12 to unlock it.
|
Now it will show the Clonezilla menu and you can save the image of the client on the server. For more details see this page.
After the image is saved, we can stop client1, remove the boot priority (that makes it boot from network), and start it again:
incus stop client1 --force
incus config device unset client1 eth0 boot.priority
incus config device show client1
incus start client1 --console=vga
7.2. Install a client from image
incus init client2 \
    --empty --vm \
    --network=LAN1 \
    -d root,size=40GB \
    -c limits.memory=2GB \
    -c limits.cpu=2
incus config set client2 security.secureboot=false
incus config device set client2 eth0 boot.priority=1
incus config device show client2

incus start client2 --console=vga
8. Testing Captive Portal
-
Install the CP on the FUSS server:
incus shell fuss-server fuss-server cp exit -
Create a VM that is connected to
LAN2(similarly to the previous examples forclient1andclient2). Then try to access the internet from it.